A brief Facebook 101: Get a guided look at security settings, how to post to your account, manage what is visible in your news feed, and connect with others. For those of you wanting to use Facebook to connect with parent groups, classes, athletics teams, etc., take a look at creating and managing Facebook groups.
The first thing I would recommend doing once you start a Facebook account, is to adjust the security and privacy settings. For those of you who have Facebooking for quite a while, checking and adjusting your settings is a wise practice to get in the habit of doing a couple times a year.
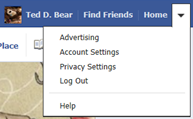
To adjust or review your account settings, select the arrow at the right top corner of your Facebook page. A drop down menu will appear. Select one of the following options:
- Account Settings — This is where you edit your basic security settings such as your email and password information.
- Privacy Settings — If you want to fine tune who can see what you post, and perimeters around your “Friends”, this is the link you want.

This is also the spot to go when you are ready to Log Out, or need Help.
Click HERE for a link to Facebook’s help at adjusting their Basic Controls.
![]()
Along the top of your Facebook page (as shown above) on the left side, are several navigation links. The dark shadow type icons beside the word “facebook” are links to:
- portrait of people — click on this to view or answer friend requests, and also for Facebook’s suggestions of who you may want to invite to be your friend. Those suggestions are based on Friends of your Friends.
- conversation clouds — this is where you can write and read private messages between you and your friends. The message feature on Facebook works similarly to email.
- globe — click on this link to view a list of notifications, activity that has happened since you last logged in to Facebook; Friends writing on your timeline, mentioning you in a status, etc.
![]()
Along the top of your Facebook page (as shown above) on the right side, are several navigation links:
- your name — (example: Ted D. Bear) will bring you to the Timeline view of your account. This is the more graphic look of your page with your profile and cover pictures along the top.
- find friends — is a spot to look for others with Facebook accounts that you may want to connect with. You can search by name, or add search specifics such as schools, locations, etc.
- home — this link brings you to the news feed of your account; a list of activity of your Friends, with the latest changes always showing at the top. There are additional links on the side of this view that we will talk about later.

Within the status update box, there are several links to make posting photo’s, and connecting with Friends easier.
You can mention a Friend and link to their page, add photo’s, link to a specific location, or event.
Click HERE for Facebook’s Help Center page for tips on all these features.
If you find that a “Friend” is frequently posting items that you’d rather not have coming across your news feed, it is possible to alter your settings to either hide that persons post from ever being on your news feed, or select what type of posts you see, without un-friending or blocking them.
To do this, simply hover over one of their posts and select the arrow that appears on the top right corner of the post. Select the “Hide” option.

Next, select the link “Change what updates you get” — this appears in place of the post. A list of options will appear, select the combination that works best for you.

For other tips on managing your news feed, click HERE.
Facebook Groups can be a useful resource to connect with athletic teams, classes, parent groups, etc. To create a group or view groups you are currently managing or participating in, select the “Home” view option on the top right of your Facebook page. This will open up your news feed view, and you want to look on the left column for groups — they are about 1/2 way down.

To begin a new group, select the “Create a Group” link. Follow the prompts and voila! you are now the proud administrator of a group.
I would recommend beginning by adjusting your Group settings by selecting the gear icon on the right of the screen. If you would like to have time to set up your group with pictures, an about section, etc. simply edit your group to the “Secret” group setting. Once you are done setting everything up, change the setting to one of the more public features.

Along the top of the Group’s page are tab type links. The name of your group (example: I love Honey) is a view of your Group’s wall, showing things that have been posted. The About tab is a place to describe the purpose of your group, and any guidelines for participants. The Events tab is a spot to create Events, or view Events. The Photos and Files tabs will show a compilation of what has been added to the Group page — this is a good place to go if you need to see a photo from an event several months ago.

Posting to Groups is very similar to updating the status and posting things on your personal Timeline. You are able to write a post, and add photo/videos. In Groups, you are also able to create a poll to ask questions, or add files (such as a class assignment).
For more information on the various Group features, and specifics around the Group Settings, click HERE.
When in doubt, check out the Help Center feature of Facebook. As mentioned in the beginning of this tutorial, you will find this by selecting “Help” from the drop down menu when you select the arrow in the top right of your Facebook page. Another drop down menu will open, select the “Help Center” link at the very bottom of the list. I find that this is the easiest way to navigate the Facebook Help features.
